Important information you need to know about Solar Charge Controller
As people's attention to renewable energy continues to increase, solar energy systems are becoming more and more popular in homes and businesses. As an important part of the solar energy system, the role of the solar charge controller cannot be ignored. It not only ensures the safe charging of the battery, but also improves the efficiency of the entire system. Knowing how to determine the charging status, how the controller works when the battery is full, and the best choice of installation location are crucial for optimizing and maintaining the system.
How Do I Know If My Solar Charge Controller is Charging?
Determining whether the solar charge controller is charging is a key step to ensure the normal operation of the solar energy system. Here are some ways to help you determine whether the solar charge controller is effectively charging the battery.
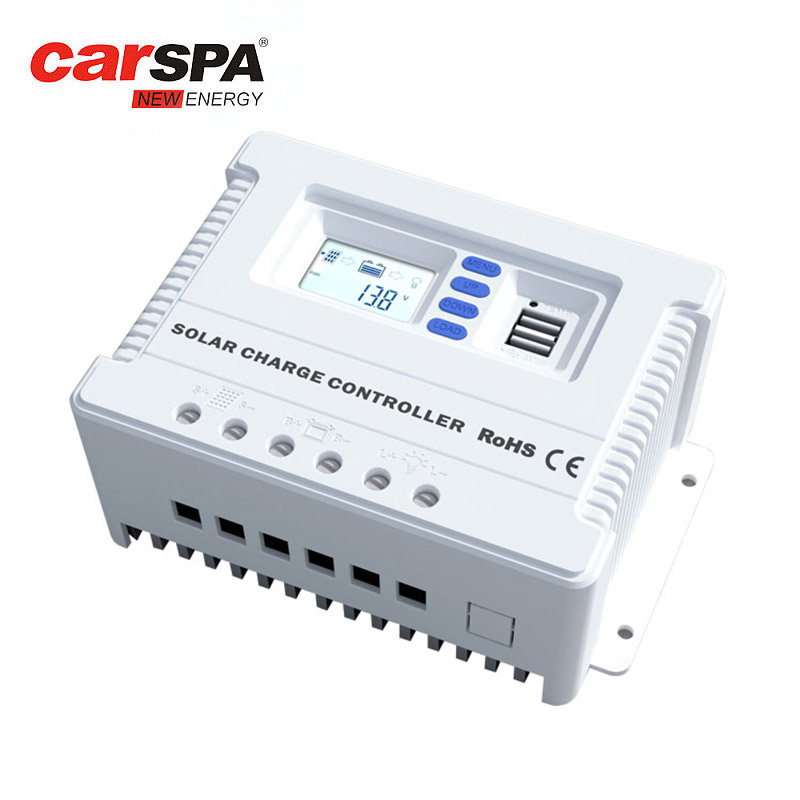
1. Check the display panel:
Most modern solar charge controllers are equipped with a digital display panel that can display real-time information such as charging status, input voltage, current, and output voltage. By observing this data, you can determine whether the solar panel is providing power to the battery. For example, if the input voltage and current are shown on the display panel, and the output voltage is steadily increasing, the controller is charging.
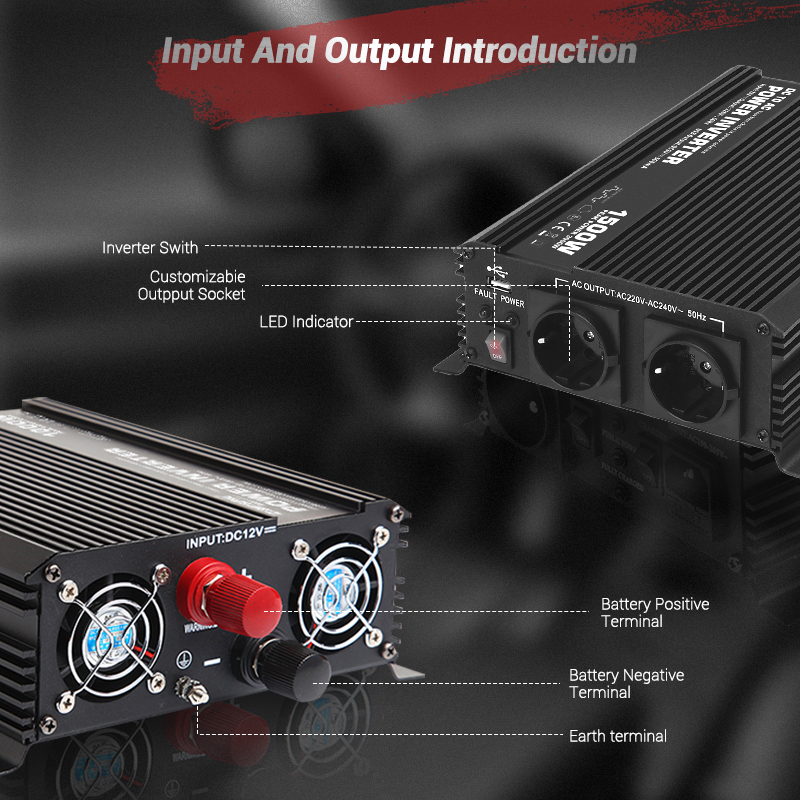
2. LED indicator:
Many solar charge controllers have LED indicators to indicate different operating conditions. Typically, a green indicator light indicates that the battery is charging, an orange or yellow indicator light indicates that the battery is nearly fully charged, and a red indicator light may indicate a fault or that the battery is too low. By observing the color and flashing pattern of the LED indicator light, you can get a general idea of the charging status.
3. Use a voltmeter or multimeter:
You can use a voltmeter or multimeter to measure the voltage change of the battery. If the voltage of the battery gradually increases during the day, this indicates that the controller is effectively charging the battery. Normally, the voltage of the battery should be kept within a safe range, such as the battery voltage of a 12V system should be between 13.5V and 14.5V.
4. Monitor system status:
Some advanced solar systems are equipped with a monitoring system that allows you to view the charging status in real time through a mobile phone app or computer software. These systems usually provide detailed charging data and history, allowing you to more intuitively understand the working of the charge controller.
5. Check the connection regularly:
Make sure that the connection between the solar panel, charge controller and battery is good. Any loose or corroded connection may affect the charging effect. Regularly checking the wires and connectors, and cleaning or replacing the problematic parts in time, can ensure that the charge controller works properly.
Through the above methods, you can more accurately determine whether the solar charge controller is charging, so as to ensure the efficient operation of your solar system.
What Does a Solar Charge Controller Do When the Battery is Full?
When the battery is full, the solar charge controller will take a series of measures to prevent overcharging and extend the battery life. The following are the main functions performed by the charge controller when the battery is full:
1. Float Charge Phase:
When the battery is close to full charge, the charge controller will enter the float charge phase. This means that the controller will reduce the charging current to keep the battery at a higher but safe voltage level. The purpose of the float charge phase is to maintain the battery full state while avoiding damage to the battery caused by overcharging.
2. Voltage Regulation:
When the battery is full, the charge controller will adjust the output voltage according to the battery type and charging strategy. For example, for lead-acid batteries, the charge controller will usually regulate the voltage to a range of 13.5V to 13.8V (for 12V systems). This voltage regulation prevents overcharging of the battery while maintaining battery stability.
3. Reduce Charge Current:
The charge controller will gradually reduce the charge current when the battery is full. This is to prevent too much current from continuing to flow into the battery, causing overheating or other damage. By precisely controlling the charging current, the charge controller can extend the life of the battery.
4. Temperature compensation:
Some advanced charge controllers have temperature compensation functions that can adjust the charging voltage according to changes in battery temperature. This helps to maintain the optimal charging state of the battery under different temperature conditions and prevent overcharging or undercharging problems caused by temperature changes.
5. Disconnect charging:
In some cases, the charge controller will completely disconnect the charging circuit to prevent the battery from continuing to charge. This usually happens when the battery is fully charged and the charging current is very low. At this time, the controller will stop supplying power to the battery until the battery voltage drops below a preset threshold, and then restart charging.
Through these measures, the solar charge controller can effectively manage the battery charging process and ensure the safety and stability of the battery at a full charge state.

How Far Should Solar Charge Controller Be from Battery?
The distance between the solar charge controller and the battery needs to be carefully considered when installing a solar system. The appropriate distance not only improves system efficiency, but also ensures safety and easy maintenance. Here are some considerations for the distance between the charge controller and the battery:
1. Cable length and voltage loss:
Cable length has a significant impact on voltage loss. The longer the cable, the greater the resistance and the greater the voltage loss. This can cause the actual voltage reaching the battery to be lower than expected, affecting charging efficiency. To reduce voltage loss, the charge controller should be installed as close to the battery as possible. It is generally recommended that the cable length should be controlled within 1 meter.
2. Cable specifications:
Choosing the right cable specifications is also important. Thicker cables (i.e. lower resistance) can reduce voltage loss, but are more expensive and difficult to install. When selecting cables, it is necessary to consider the cable length and current size comprehensively, and select a cable specification that is both economical and meets the system requirements.
3. Heat dissipation requirements:
Solar charge controllers generate a certain amount of heat when working, and good heat dissipation conditions are required. If the controller is installed near the battery, especially in a confined space, it may cause poor heat dissipation, which will affect the performance and life of the controller. Make sure there is enough ventilation space around the controller to help it dissipate heat.
4. Maintenance convenience:
Mounting the charge controller in an easily accessible location can simplify maintenance and inspection work. If the distance between the controller and the battery is too far, inspection and maintenance may become inconvenient. Therefore, under the premise of ensuring that the cable length is reasonable, try to choose a location that is easy to maintain to install the controller.
5. Safety considerations:
The connection between the battery and the charge controller requires good electrical contact to avoid looseness or short circuit. Cables that are too long are easily affected by external factors and increase the risk of electrical failure. Ensuring that the cable connection is firm and using appropriate protection devices can improve the safety of the system.
6. Other factors:
In addition to the above considerations, adjustments should be made according to specific circumstances. For example, factors such as ambient temperature, humidity, and installation space will also affect the optimal installation distance. Taking these factors into consideration, the optimal installation location and distance can be selected.
In general, the solar charge controller should be installed as close to the battery as possible, but at the same time, factors such as heat dissipation, maintenance convenience, and safety should be considered. In practice, the distance between the controller and the battery is usually controlled within 1 meter, but the specific distance needs to be adjusted according to the actual situation of the system. Through reasonable layout, the efficient, safe and stable operation of the solar system can be ensured.
Conclusion
The correct use of the solar charge controller can not only extend the service life of the battery, but also improve the overall efficiency of the solar system. By knowing how to tell the state of charge, understanding how the charge controller works, and choosing the right installation location, you can ensure your solar system is operating at its best. Continuous attention to these details will make your renewable energy system more reliable and efficient.