How to safely connect a battery to a 1000 watt power inverter
In modern life, the stability and reliability of power supply are crucial for home and outdoor activities. Whether it is to deal with unexpected power outages or to provide power for electrical equipment during outdoor trips, 1000 watt power inverters have become an ideal choice for many people. However, correctly connecting the battery and inverter is not only related to the normal operation of the equipment, but also to the safety of the user. In this article, we'll detail how to professionally connect your battery to a 1000-watt inverter, with step-by-step guidance to help you complete the process safely and efficiently.
Step 1: Preparation
Detailed preparation is crucial before you start connecting the battery and 1000 watt power inverter.
First, you need to choose the appropriate battery. Inverters usually use 12V or 24V deep cycle batteries, which are designed for long-term discharge and are suitable for use with inverters. Deep cycle batteries can withstand multiple charge and discharge cycles and have a long life, making them ideal for use in inverter systems. When selecting a battery, calculate the required capacity based on your power needs. For example, if you plan to use a high-power device for a long time, it is recommended to choose a battery with a larger capacity.
Secondly, check the specifications of the inverter. Make sure the input voltage of the inverter matches the battery voltage. For example, a 12V inverter should be matched with a 12V battery, and a 24V inverter should be matched with a 24V battery. In addition, it is necessary to know the maximum input current and output power of the inverter. A 1000 watt power inverter has an output of 1000 watts, you need to make sure the battery can provide enough current to meet the needs of the inverter. Generally, the greater the Ampere-hour (Ah) capacity of the battery, the more continuous current it can provide, making it suitable for use in high-power inverters.
Before starting work, safety equipment cannot be ignored. Wearing insulating gloves and goggles can effectively prevent electric shock and other accidental injuries. Have the necessary tools ready, including screwdrivers, cable cutters, and wrenches, which are essential when connecting cables and tightening bolts. A complete tool kit ensures that the entire process runs smoothly and avoids stalls due to missing tools.
Step 2: Install the battery
Choosing a suitable location is the first step in installing the battery. Batteries should be placed in a dry, well-ventilated place, away from direct sunlight and high temperature environments. Excessively high temperatures will shorten the life of the battery and reduce its performance. The ideal location should be away from flammable materials and wet areas to reduce the risk of accidents. The battery should be placed on a level and stable surface to prevent it from tilting or falling over.
Next, secure the battery. Batteries are usually heavy and must be securely fixed. Use a battery holder or other support device to ensure that the battery does not shift during vibration or movement. Securing the battery not only prevents accidental displacement, but also provides a clean installation environment to facilitate subsequent connection and maintenance work.
When fixing the battery, attention should be paid to the ventilation of the battery. Many batteries produce small amounts of gas during charging or discharging. Good ventilation can avoid the accumulation of these gases and prevent potential dangers. Ensure there is adequate air circulation around the battery and avoid installation in a confined space.
Step 3: Connect the Cables
Before connecting the cables, it is important to select the appropriate gauge. Cable selection should be based on the power requirements of the inverter. For a 1000w power inverter, you will typically need to use 4 AWG or thicker cable. The larger the cable diameter, the lower the resistance and the greater the current it can carry, which is especially important for high-power applications.
Once you have selected the right cable, the next step is to cut the cable. The distance between the battery and the inverter affects the cable length. The cable length should be moderate, neither too short to make the connection impossible nor too long to cause unnecessary resistance. Use cable cutters to carefully cut the cable, making sure the cuts are flat.
After cutting the cable, you need to strip the insulation from the cable. Use cable cutters to peel off the insulation on both ends to expose a sufficient length of copper wire for easy connections. When peeling off the insulation, care should be taken to avoid damaging the internal copper wires. Exposed copper wires should be kept clean and free of dirt and oxides to ensure good electrical contact.
Step 4: Connect the battery terminals
When connecting the battery terminals, first install the cable connector. Install appropriately sized cable glands on the stripped cable ends, which may be crimp-on or bolt-on. The selection of cable connectors should match the cable specifications to ensure that the connectors are tightly connected to the cables. Use a crimping tool or screwdriver to make sure the connector is secure and not easy to loosen.
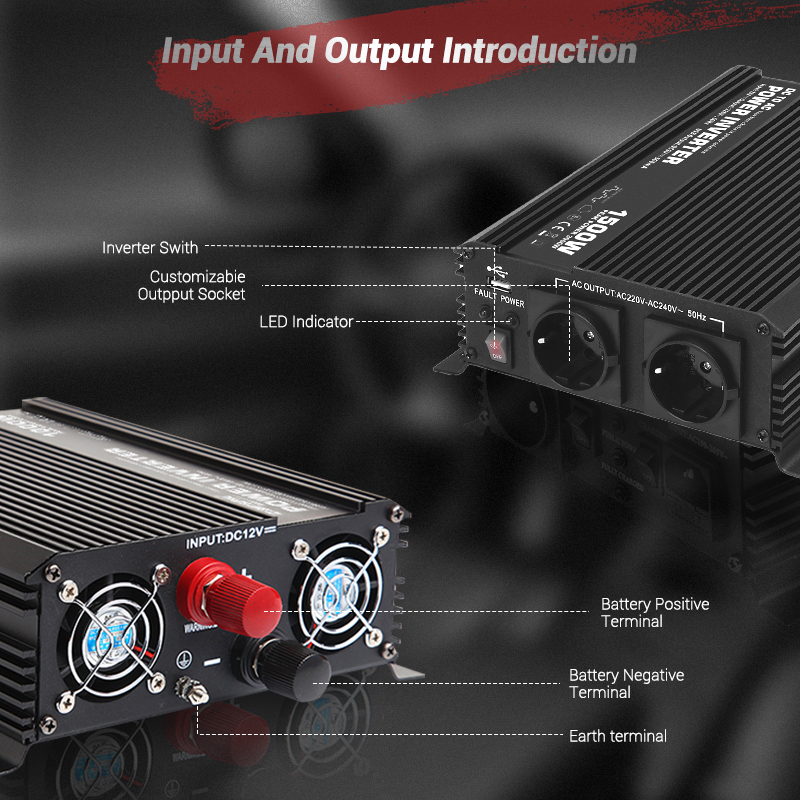
Next, connect the cable connectors to the positive and negative terminals of the battery. The positive terminal of the battery is usually marked with a "+" sign, and the negative terminal is marked with a "-" sign. Make sure the polarity is correct when connecting and avoid reverse connection. Use a wrench or screwdriver to tighten the bolts, making sure there is good contact between the connector and the battery terminals and a secure connection.
When connecting the battery terminals, care should also be taken to prevent short circuits. Avoid letting exposed copper wires or connectors come into contact with other metal objects, especially when connecting multiple batteries or complex systems. Short circuits may cause serious equipment damage or even safety accidents. The joints can be wrapped with insulating material for added safety.
Step 5: Connect the inverter side
Before connecting the inverter side, first check the input terminals of the inverter. The input terminals of the inverter are usually marked with "+" (positive pole) and "-" (negative pole) symbols to ensure clear identification and avoid misconnection. After confirming the terminal positions, connect the other ends of the cables to the positive and negative input terminals of the inverter respectively.
When connecting, use a screwdriver or wrench to tighten the bolts to ensure good contact between the cable and the inverter terminals. Loose connections can cause poor electrical contact, generate heat, and even start a fire. During the connection process, keep cables and terminals clean to prevent dirt and oxides from affecting electrical contacts.
After the connection is complete, check all connection points again. Make sure all bolts and connectors are tight and cables are not loose or bent. A good connection not only ensures the efficiency of current transmission, but also improves the stability and safety of the system.
Step Six: Inspect and Test
After all connections are made, a thorough inspection and testing is the last and most critical step. First, carefully check all cable connection points to ensure there are no loose connections or poor connections. Make sure the polarity of cable connectors and terminals is correct and avoid reverse connection.
Next, install a fuse or circuit breaker. A fuse or circuit breaker should be installed between the battery and the inverter, with the appropriate size selected based on the power of the system. A fuse or circuit breaker can automatically open the circuit in the event of an overload or short circuit, protecting the battery and inverter from damage. Make sure the fuse or circuit breaker is installed in a reasonable location for easy inspection and replacement later.
After completing the inspection, turn on the battery and inverter. Press the power switches of the battery and inverter, observe the indicator lights and display of the inverter, and confirm that the system is working properly. The display screen of the inverter usually displays input voltage, output power and other information. Through these data, it can be judged whether the system is running normally.
Finally, connect the appropriate load equipment and test the inverter output. Select some low-power devices, such as light bulbs or fans, for preliminary testing to ensure that the inverter can supply power normally. Gradually increase the load and test the performance of the inverter under different loads to ensure that it can output the rated power stably.
Precautions
Throughout the entire connection process, security always comes first. Electrical safety regulations should be followed during operation, and appropriate safety equipment should be worn to avoid short circuits and electric shocks. Especially when connecting and disconnecting cables, care should be taken to avoid contact with exposed copper wires.
Check the battery and cable connections regularly to ensure the system is always in good condition. Batteries and cables may become loose or oxidized during long-term use. Regular inspection and maintenance can extend the service life of the equipment and improve the reliability of the system.
Use the inverter rationally to avoid long-term overload operation. When the inverter is overloaded, it will generate a lot of heat, which may damage the equipment or cause safety accidents. According to the power specifications of the inverter, the electrical load is reasonably arranged to ensure that the system operates within a safe range.
Conclusion
With the above detailed steps and precautions, you can professionally and safely connect the battery to the 1000 watt power inverter to ensure stable operation and efficient power supply of the system.
Through the above detailed steps, you can safely and professionally connect the battery to the 1000-watt power inverter to ensure stable operation and efficient power supply of the system. During operation, always keep safety first, regularly inspect and maintain equipment, and avoid overload operation to extend the service life of the system. Proper connections and maintenance not only improve the performance of your equipment, but also provide you with reliable power support during critical moments. I hope this article can provide you with valuable guidance for practical operations so that your power system is always in optimal condition.


