How do I install a 1000 watt power inverter in my car?
The fast-paced life makes car inverters a must-have for many car owners, especially those who like to travel and camp. Installing a 1000-watt power inverter in the car can undoubtedly greatly improve our quality of life. Whether it is a long-distance trip or outdoor camping, the car inverter can provide us with stable power to meet the needs of various electrical equipment. So, how to properly install this practical device in the car? This article will provide you with a detailed installation guide and precautions to help you complete the installation process easily.
1. Preparation and tools
Before starting the installation, you first need to prepare the relevant tools and materials. This includes:
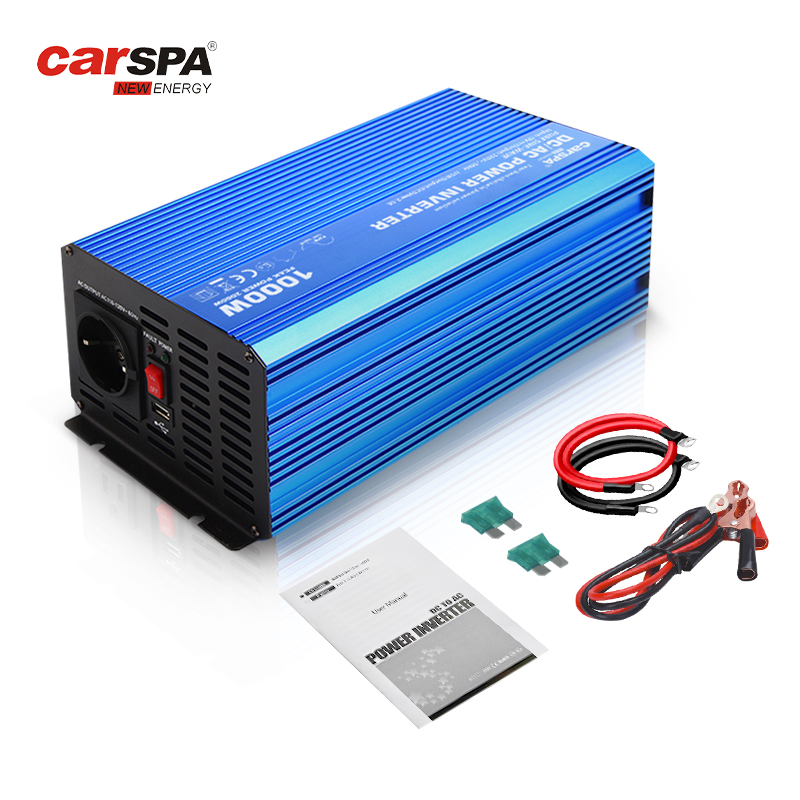
Inverter host: Choose a 1000 watt power inverter that suits your needs.
Battery cable: Used to connect the inverter and the vehicle battery.
Fuse box and fuse: Protect the circuit safety.
Screwdriver, wrench, pliers: Used to fix and connect various components.
Electrical tape and cable ties: Used to fix wires and insulation.
Voltmeter: Used to test voltage to ensure safe connection.
Before installation, make sure your vehicle battery is fully charged and there are no other running electrical devices in the vehicle. Also make sure the installation environment is dry to avoid electrical short circuits.
In addition to the above tools and materials, the following factors should also be considered:
Vehicle battery capacity: Make sure the battery capacity is sufficient to support the power output of the inverter. A 1000-watt inverter consumes more power when fully loaded, and insufficient battery capacity may cause the battery to drain quickly.
Vehicle electrical system: Check whether the vehicle electrical system can support the additional load. If the vehicle electrical system is older, it may need to be upgraded or inspected.
Inverter heat dissipation problem: Long-term use of the inverter will generate a lot of heat, so you need to ensure that the inverter is installed in a well-ventilated place to avoid overheating that affects its life and performance.
2. Detailed explanation of installation steps
1. Choose an installation location
First, you need to choose a suitable installation location. The inverter should be placed in a well-ventilated place to prevent overheating. Common installation locations include:
Under the seat
Trunk
Next to the passenger seat
Make sure the inverter does not interfere with driving operations and is not close to water or flammable items.
2. Install the fuse box
Install the fuse box between the battery and the inverter. The fuse box should be as close to the battery as possible to reduce the risk of short circuits in the wires. Choose a fuse that is suitable for the inverter power, for example, a 1000-watt inverter usually requires a 100-amp fuse.
3. Connect the battery wire
Connect the inverter to the vehicle battery with the battery wire. Pay attention to the correspondence of the positive and negative poles when connecting, the red wire connects to the positive pole and the black wire connects to the negative pole. To ensure safety, you can disconnect the negative pole of the battery before connecting.
4. Fix the inverter
Use screws and wrenches to fix the inverter in the predetermined position. Make sure it is firmly fixed to avoid displacement during vehicle driving.
5. Ground wire connection
Connect the ground wire of the inverter to the metal part of the vehicle body to ensure the stability and safety of the circuit. The ground wire is usually green or black.
6. Connect electrical equipment
After the inverter is installed, you can start connecting electrical equipment. Plug in the electrical plug, turn on the inverter switch, and ensure that the inverter works properly.
7. Test
Use a voltmeter to test the inverter output voltage and make sure that the voltage is stable at around 220 volts. If the voltage is unstable or there are other problems, check whether the circuit connection is correct.
In each step, you need to carefully check each connection point to ensure that there is no looseness and poor contact. At the same time, pay attention to wearing insulating gloves during operation to prevent the risk of electric shock.
In addition, when connecting electrical equipment, be careful that the total power of the electrical equipment does not exceed the rated power of the inverter. Generally speaking, a 1000-watt inverter can support the use of common small appliances such as laptops, mobile phone chargers, and TVs. However, if multiple high-power devices need to be used at the same time, a higher-power inverter may be required.
III. Precautions and Maintenance
1. Safety Precautions
When installing and using the inverter, pay special attention to the following points:
Do not overload the inverter to ensure that the total power does not exceed 1000 watts.
Regularly check the battery wires and connection points to prevent looseness and aging.
Avoid using the inverter in a hot or humid environment.
2. Daily maintenance
In order to ensure the long-term use of the inverter, regular maintenance is required:
Cleaning: Clean the inverter and cooling fan regularly to prevent dust accumulation from affecting the cooling effect.
Check the connection: Check the wires and connection points regularly to ensure that they are not loose or damaged.
Storage: When not in use, turn off the inverter power supply to avoid long standby.
3. Troubleshooting
If the inverter does not work properly, you can follow the steps below to troubleshoot:
Check whether the battery power is sufficient.
Check whether the wire connection is firm.
Test whether the fuse is intact and replace the fuse if necessary.
In addition, you also need to pay attention to the use environment of the inverter. Try to avoid using the inverter in a hot, humid or dusty environment. These environmental factors may affect the normal operation of the inverter and even cause damage to the equipment.
For users who use the inverter for a long time, it is recommended to conduct professional inspections and maintenance regularly. This can detect potential problems in time and avoid safety hazards caused by equipment failure.
IV. Internal structure of the RV inverter
Before understanding how to install the inverter, understanding its internal structure can help us better operate and maintain it. The internal structure of a 1000-watt power inverter mainly includes the following parts:
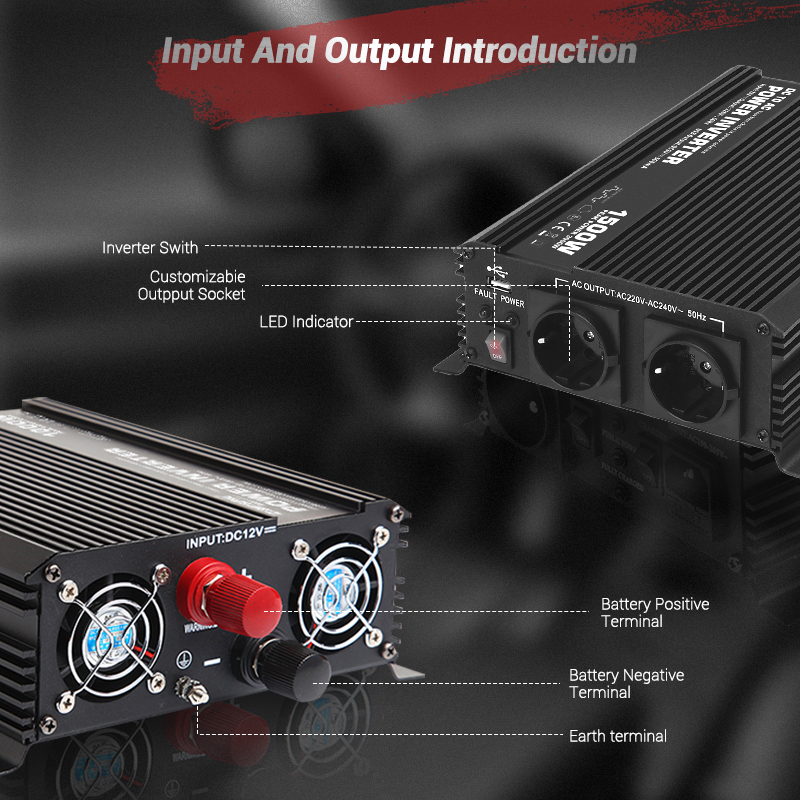
DC input terminal: This is the interface for connecting the vehicle battery, usually marked with positive and negative symbols. The DC power of the battery enters the inverter through the input terminal.
Inverter main circuit board: This is the core part of the inverter, which contains multiple electronic components and control chips. Its main function is to convert DC power into AC power. The main circuit board usually contains key components such as filters, rectifiers and inverter modules.
Heat dissipation device: Since the inverter generates a lot of heat when working, an effective heat dissipation device is required to maintain its normal operation. The heat dissipation device usually includes a heat sink and a fan, which is located on both sides or the top of the inverter to ensure that the internal temperature is not too high.
AC output terminal: This is the interface for outputting the converted AC power, which can be connected to various electrical devices. The output terminal is generally a standard power socket, which is convenient for inserting different types of plugs.
Protection circuit: In order to ensure the safe operation of the inverter, a variety of protection circuits are set up inside, such as overload protection, overheating protection and short circuit protection. These protection circuits can quickly cut off the power supply when abnormal conditions occur to prevent accidents such as equipment damage or fire.
Control panel: The control panel of the inverter is usually set on the outside for user operation and monitoring. There are switches, indicator lights and display screens on the control panel to display the current working status and voltage conditions.
Understanding the internal structure of the inverter can not only help us better install and use the equipment, but also quickly locate the problem when a fault occurs, and effectively eliminate and repair it.
V. Inverter Purchase Guide
Choosing a suitable inverter has an important impact on its normal use and life. When purchasing a 1000W inverter, you need to consider the following aspects:
1. Brand and quality
Choose inverters from well-known brands (such as CARSPA). The price of such inverters may not be the cheapest, but their quality and after-sales service are more guaranteed. There are many inverter brands on the market. Friends in need can choose a suitable brand through online reviews and user feedback.
2. Power and efficiency
In addition to the rated power, the efficiency of the inverter must also be considered. High-efficiency inverters can better convert electrical energy and reduce power loss. Generally speaking, the higher the efficiency, the better the performance of the inverter.
3. Protection function
Good inverters are usually equipped with a variety of protection functions, such as overload protection, overheating protection, short circuit protection, etc. These protection functions can provide additional safety during use.
4. Use environment
Choose a suitable inverter according to the use environment. If it is used in a high temperature or humid environment, you need to choose an inverter with waterproof and dustproof functions.
5. After-sales service
Choose a brand that provides good after-sales service so that you can get help and repair services in time when there is a problem with the equipment.
During the purchase process, you can refer to professional reviews and user reviews to get more useful information and help yourself make a better choice.
VII.What are the practical uses of car inverters?
Installing a 1000W car inverter is not just for meeting basic personal electricity needs, it has a wide range of uses in practical applications, which are listed in detail below:
1. Camping and outdoor activities
In camping and outdoor activities, the inverter can power various devices, such as portable refrigerators, lamps, fans, etc., to improve the quality of life. Especially in remote areas, the inverter becomes a reliable source of electricity.
2. Long-distance travel
For long-distance travelers, the inverter is an indispensable device. It can charge devices such as mobile phones, laptops, tablets, etc., ensuring that you always stay connected and entertained during your journey.
3. Commercial use
For some small commercial activities, such as mobile food trucks or outdoor market stalls, the inverter can provide power support for lighting equipment and electrical appliances to ensure normal operation.
4. Emergency
In emergency situations, such as natural disasters or unexpected power outages, the inverter can provide emergency power to ensure basic living needs and safety.
Installing a 1000W car inverter not only facilitates our lives, but also provides many solutions for emergency situations. It is a device worth investing in.
Conclusion
Installing a 1000W car inverter can greatly enhance your travel experience and provide convenient power support for your journey. You can use a laptop to work in the car, or power a microwave oven, etc. I hope that through the detailed introduction of this article, you can master the basic steps and precautions of installation, and I also hope that you can successfully complete the installation and fully enjoy this convenient technology in your future travels. Whether it is charging electrical appliances or using small appliances in the car, the car inverter will become your right-hand man on the journey.


.jpg)

.jpg)


